


A Step-by-Step Guide to Migrating Your WordPress Site to a New Host
A Step-by-Step Guide to Migrating Your WordPress Site to a New Host – Are you prepared to switch to a new host or server and transfer your WordPress website? It doesn’t have to be difficult or unpleasant to transfer your website to a new host. Even though moving a WordPress site involves many crucial procedures, if you follow our instructions, you can succeed.
Many consumers are forced to switch to a new provider due to issues with their existing one. They’ve had enough. On the other hand, switching to a more reputable host is sometimes put off out of concern about making a mistake that might harm your website (s).
People may spend a significant amount of money hiring a specialist to transfer their site for them in order to get around the issue. Alternately, look for a new host that includes a migration service in their new hosting bundle. The third alternative is to try it yourself, which is what some readers of this post choose to do.
Migrating need not be an issue if you take the time to prepare your own website. If done correctly, it may be a pretty simple job, and if anything goes wrong, you can quickly go back.
Let’s go over the procedures needed to transfer your WordPress website to a new host, but first, bear in mind that many of the top WordPress hosting companies will actually do the transfer for you. If you recently bought a new hosting plan and are considering moving your website, check with your new hosting provider to see if they offer free migration.
Table of Contents
You may quickly get to any part by scrolling down, or you can bookmark any of the links below to make it simpler to return if you need to take a break:
-
-
- Backup the files on your website.
- WordPress database export.
- On your new host server, create the WordPress database.
- Edit the wp-config.php file.
- Import a Database
- The WordPress files should be uploaded to your new hosting company.
- Creating a New Domain and Finding/Replacing an Existing Domain
- Final touches
-
A Step-by-Step Guide to Migrating Your WordPress Site to a New Host
Step 1: Backup the files on your website

The first step in any migration is to take a complete backup of your website. This is excellent practice before making any significant changes and should be a part of your overall WordPress security. However, there is also a need for migrating your WordPress installation since so much data is being transported.
How do you back up your website, then? You may use a variety of plugins to back up WordPress for you. You normally install a backup plugin and utilize built-in options to control which files are backed up, how often they happen, and where your backups are saved.
If you wish to utilize a plugin, one of the finest possibilities is WPvivid. This plugin gives you a lot of effective backup options, such as scheduling, restoration points, file limits, huge file filtering, backup splitting, backing up themes and plugins, using remote storage, supporting multiple sites, and more.
As an alternative, you might use a more manual method. To offer you a fast overview, manual backups need a file transfer program (FTP) in order to access your website data. FileZilla (PC) and Transmit are two well-known FTP apps (Mac). Following installation, you’ll want an SFTP credential (from your web host account) to connect to the server hosting your website. After connecting, choose and download every file located in the directory of your website. This applies to hidden files like the .htaccess one. If you are unable to view this file, go to the help section of your FTP application to have it reveal hidden files.
Depending on the quantity of media uploads you have on your site, this might take some time. We could start step two and make a copy of your database while this download is still going on.
Step 2: WordPress database export
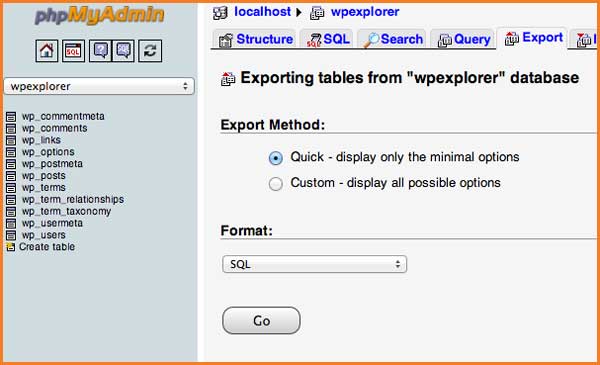
The process of exporting your database is straightforward and only involves a few steps. Open the phpMyAdmin program by logging into your web server’s cPanel account. After choosing the database for your WordPress installation from the list on the left sidebar, click the Export tab in the navigation menu.
The Quick export’s default options and the export’s SQL format are enough for our needs. The database export procedure will start after you click the Go button, and a file will be downloaded to your local computer.
You are prepared to go to the next step after the database export and the FTP transfer of your files have both been finished.
Step 3: On your new host server, create the WordPress database
Before starting the transfer to the new web server, we must set up a location for installing WordPress. You need to establish a database in which you can import your SQL data in order to do this.
Utilize the login credentials they have provided you to access the cPanel program on your new web server. We’ll be using the MySQL Databases program for our guidance. If your web host doesn’t currently run that program, get in touch with them to find out how they create new databases.
A database may be created in a few easy steps.
- Create a new database in MySQL by opening it and giving it a name that is acceptable for your website.
- Make a fresh MySQL user (with a secure password).
- Give this user account full access to the new database and add it.
Note the database name, the new MySQL account, and the password associated with it. You’ll soon need them.
Step 4: Edit the wp-config.php file.
Go to the local computer location where you downloaded the website files. In that folder, there is a file called wp-config.php that controls the access between WordPress and your database.
This file should be duplicated and kept on your home computer in a different folder. This is essential in case something goes wrong after we make the modifications we are going to make.
Use your preferred text editor to make the following three changes to the original file:
1. alter the database’s name.
The line that begins:
define('DB_NAME', 'db_name');
The MySQL database name of your previous web host is presently configured in the db_name field of this line. The name of the new database you just established must be substituted here.
2. Modify the database user name.
This is followed by the following:
define('DB_USER', 'db_user');
In this line, you need to replace the db_user part of your old host’s username with the new username.
3. Modify your database user password.
Edit the third line last.
define('DB_PASSWORD', 'db_pass');
The new safe password you set for your MySQL user must be substituted in the db_pass part of this line, just as with the others.
Now save wp-config.php and close the file.
Step 5: Import a Database
You now have a fresh database to deal with, so let’s start the import procedure.
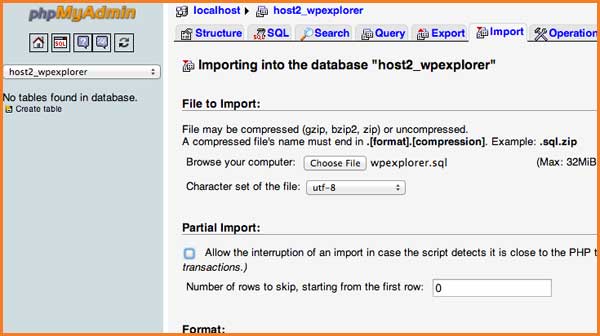
On your new server, open phpMyAdmin from the cPanel program and choose your new database from the list in the left-hand sidebar. Select the Import tab from the navigation menu after it has opened.
Click the Choose File button in the File to Import section and find the SQL file you exported before.
Make sure the format is set to SQL, uncheck the Partial Import checkbox, and then click the Go button. The import of the database will now start.
Depending on the size of your database, this import might take a while. When it’s finished, you ought to get a notification informing you that the import went well.
Step 6: The WordPress files should be uploaded to your new hosting company
Now that you have the new database prepared and you’ve reconfigured the wp-config.php file, it is time to begin uploading your website’s files.
Using your FTP tool, connect to your new web server and go to the folder that will house your website. The standard procedure is to upload the files to the public_html folder if this is the sole site being put up on this web server.
With the remote directory selected, you can upload your website files that should now include the updated version of wp-config.php. Similar to the last download, this one may take some time.
Once the upload is complete, keep these files on your local computer.
Step 7: Creating a New Domain and Finding/Replacing an Existing Domain
You should go through this step if you are switching to a new or different domain. If not, there is no need to alter your website to refer to a new domain, so you may skip this step.
The fact that they’ve included links to other articles on their site or directly inserted photos by linking to a URL on the server, which causes things to fail when transferred over to a new domain, is one problem individuals always seem to have when relocating their sites. We advise you to look at the Search Replace DB script on GitHub if you want to quickly and simply search for all occurrences of your old domain name and replace them with the new one. You will be able to achieve this quite easily thanks to this. Make sure it’s not in your root domain and that you DELETE it once you’re done (for security reasons). Create a temporary folder with an arbitrary name to house the script instead.
The site URL and home URL entries in the database will also change when you search and replace the old domain with the new domain (Changing the Site URL). This will ensure that your site won’t attempt to redirect you to the old domain when you try to log in on the new domain.
Step 8: Final touches
This stage really consists of two smaller steps that might perhaps be separated by a few days.
First things first: you must change the DNS settings for your domain before you can use the site on your new server. You will need to direct the appropriate records to the new server IP address since they will be configured to link to your old host.
Depending on where you registered your domain, this procedure will vary. Although there are too many specifics to cover in this article, your domain registrar should have all the information you need to make this move.
The entire propagation of DNS updates might take up to 48 hours. It’s preferable to do this when you anticipate reduced traffic volumes. You shouldn’t alter your website during these 48 hours as you could be altering an older version of the site.
Second, now that the 48-hour window has passed, you should be able to access the new web host when you visit your website. You may now log in to your previous web server and remove the files and database. You should still have a local backup copy of these files and the database export, along with the original wp-config.php file in case you need to roll back the migration. To be on the safe side, it may be a good idea to save these documents for a long time.
As you can see, when broken down into the simple stages outlined above, the procedure isn’t all that difficult. All you really need to do is be careful at every step and give yourself the option of going back to the original form right up until the last second (in case something goes wrong).
Have you just moved your WordPress website? Share your thoughts on the procedure in the comments box below! If you want to learn more with video courses, then visit now Udemy Free Courses
Also, if you are afraid or don’t have time to do this, then hire our professional WordPress developer.